
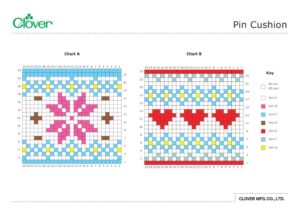
Pin Cushion

Designed by
Sachiyo Ishii
Finished Size
6 x 6 cm
Tools

Materials
• [A] A small amount of white DK
• [B] A small amount of pink DK
• [C] A small amount of light blue DK
• [D] A small amount of light brown DK
• [E] A small amount of red DK
• [F] A small amount of grey DK
• [G] A small amount of yellow green DK
• Toy stuffing
About yarn used for samples
• DK weight, 50g per 165m, 55% Nylon, 45% Acrylic
Tension
32 sts and 35 rows for a 10 x 10 cm tension square over St st (not essential).
Practical tips
• Leave a long end at the beginning and end of each piece for sewing
• Sew seams with RS facing, using mattress stitch.
Abbreviations
RS: right side
WS: wrong side
St st: stocking stitch
St(s): stitch(es)
K: knit
P: purl

Making
Design A
With yarn C, cast on 25 sts. Starting with a k (RS) row, work rows 1-24 of Chart A, reading odd-numbered (RS) rows from right to left and even-numbered (WS) rows from left to right.
Row 25 (RS): p for folding edge.
With yarn C, work 24 rows in St st, starting with a p row. Cast off.
Design B
With yarn E, cast on 25 sts. Starting with a k (RS) row, work rows 1-24 of Chart B, reading odd-numbered (RS) rows from right to left and even-numbered (WS) rows from left to right.
Row 25 (RS): p for folding edge.
With yarn E, work 24 rows in St st, starting with a p row. Cast off.
To make up
Weave in all yarn ends on wrong side of piece. Sew side seams and stuff, then sew top edge closed. To make fringes, cut an 8cm length of yarn C (Design A) or yarn E (Design B), fold in half and thread a needle with both ends of the folded strand. Insert the needle from front to back at corner of pin cushion but do not pull strand all the way through. Remove needle from strand, leaving yarn ends at the back of the cushion and the folded loop at the front. Thread the yarn ends through the loop and pull tightly. Trim yarn ends to neaten if desired. Repeat to add a couple more fringes to the same corner, then repeat to make fringes for remaining three corners.