
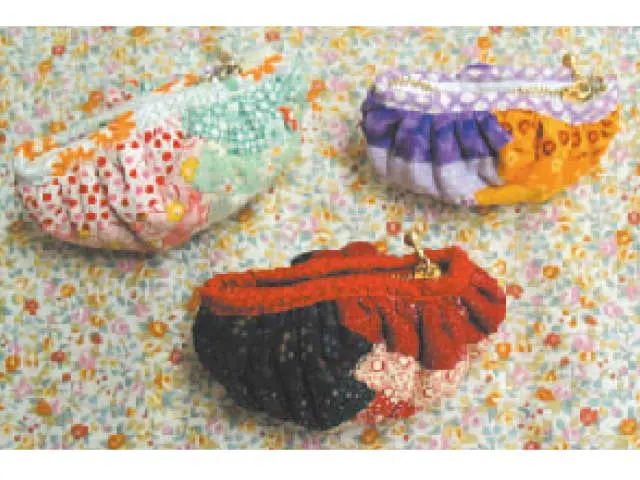
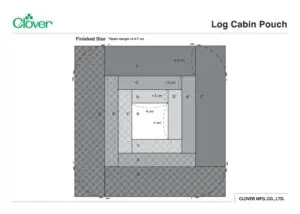
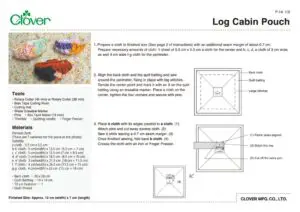
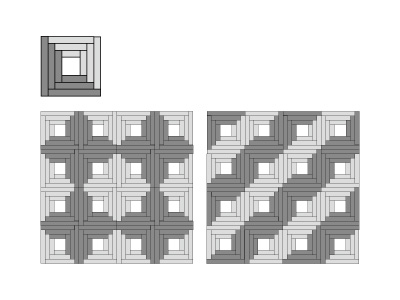
Log Cabin Pouch
Taille finie
Approx. 12 cm (width) x 7 cm (length)
Outils


Cutting mat
Water Erasable Marker
Pins
Thimble
Quilting needle
Finger Presser
Matériels
Printed cloth
(There are 7 varieties for the piece in the photo)
Suitably
a cloth : 5.5 cm x 5.5 cm
b b’ cloth: 3 cm(width) x 12.5 cm (5.5 cm + 7 cm)
c c’ cloth: 3 cm(width) x 15.5 cm (7 cm + 8.5 cm)
d d’ cloth: 3 cm(width) x 18.5 cm (8.5 cm+ 10 cm)
e e’ cloth: 3 cm(width) x 21.5 cm (10 cm+ 11.5 cm)
f. f’ cloth : 4 cm(width) x 26.5 cm (11.5 cm + 15 cm)
g g’ cloth: 4 cm(width) x 33 cm (15 cm + 18 cm)
• Back cloth · · · 20 x 20 cm
• Quilt Batting · · · 19 x 19 cm
• 10 cm Fastener · · ·1
• Quilt thread
Fabrication
Prepare a cloth to finished size (See page 2 of instructions) with an additional seam margin of about 0.7 cm. Prepare necessary amounts of cloth: 1 sheet of 5.5 cm x 5.5 cm a cloth for the center and b, c, d, e cloth of 3 cm wide, as well 4 cm wide f-g cloth for the perimeter.
Align the back cloth and the quilt batting and sew around the perimeter, fixing in place with big stitches. Decide the center point and mark it with an X on the quilt batting using an erasable marker. Place a cloth on the center, tighten the four corners and secure with pins.
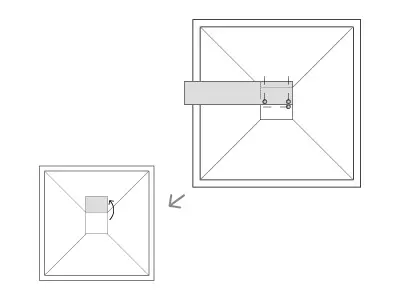
Place b cloth with its edges parallel to a cloth. (1)
Attach pins and cut away excess cloth. (2)
Sew it while leaving a 0.7 cm seam margin. (3)
Once finished sewing, fold back b cloth. (4)
Crease the cloth with an iron or Finger Presser.
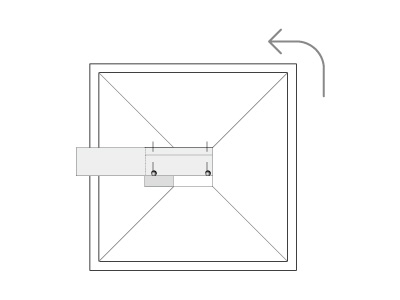
Next turn the piece 90 degrees counter clockwise, place down and stitch b' cloth leaving a 0.7 cm seam margin. Then attach piecec in the order: c c' d d' e e' f f' g g'.
(1) Rotate 90 degrees counter clockwise
(2) Align the edge of the fabric
(4) Sew this line
(3) Cut off excess parts
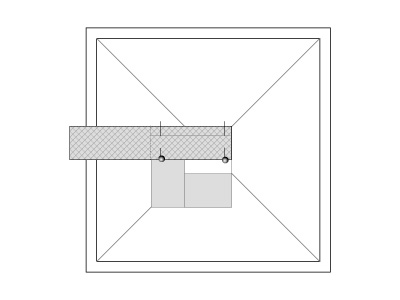
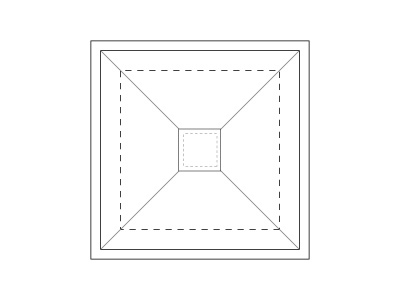
If you connect as far as g cloth it will look like the diagram on the left. Avoiding the sewn area round off the corners by cutting them (the ----- area).
Next, 1.5 cm from the side, sew around the edge with double strand large stitches for gathering and pull up gathering to 22 cm.
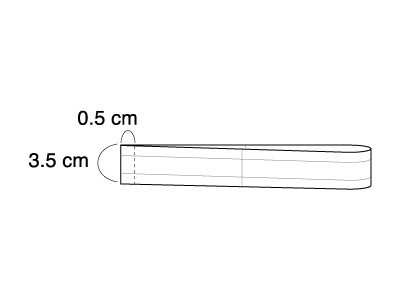
Prepare a 3.5 cm x 23 cm Bias Cloth. (The photo uses the same print as "a" cloth). Make your bias tape using the Bias Tape Maker.
Take the bias tape from step 6, turn it inside out and stitch it into a circle, 0.5 cm from the edge. Divide the circle into 4 and make a distinguishable mark with an Erasable Marker every 5.5 cm.
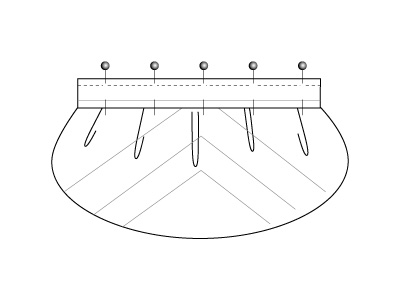
Take the main body from step 5 (log cabin design at the front) and attach the bias tape from step 7 to the sides with pins. Matching 4 rounded corners to mark on binding. Stitch on crease line made with the iron while keeping the gathering neat.
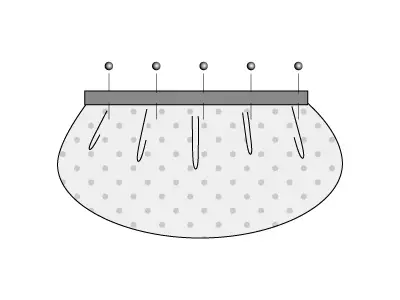
Turn the main body over and insert zip, turn down bias and sew.
Carefully apply piping, making sure it is inconspicuous and does not become visible from the front at the corner of the log cabin and make sure they match with the marks made on the bias tape. Make sure it is completed cleanly.
Attach a fastener. For smooth opening and closing, attach to one side and test the opening and closing of it to the other side, while securely back stitching it in place to complete the design.
""Log Cabin"" is the pattern we have created here. If you try making it with other colors in lighter and darker shades, you can achieve further variation and enjoyment.