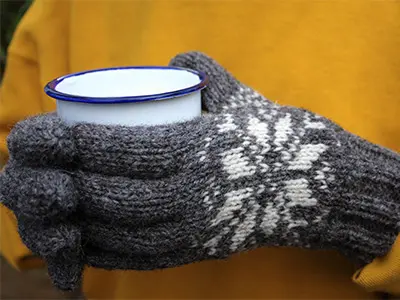
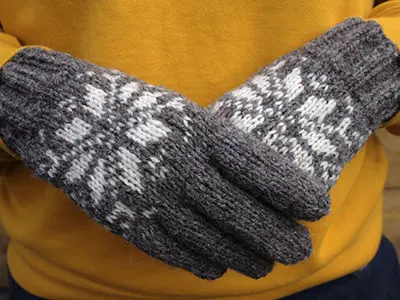
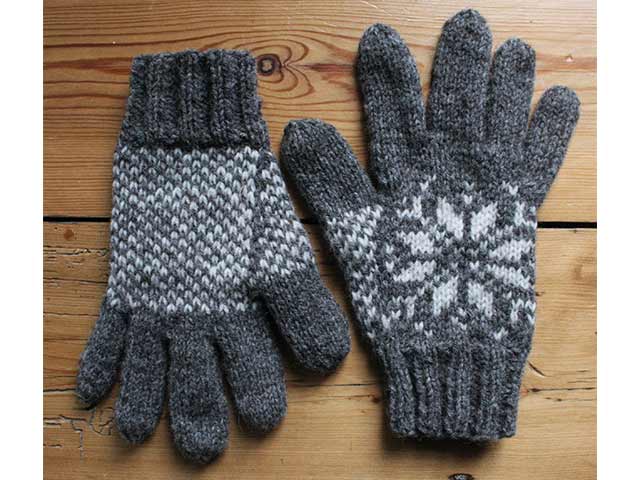
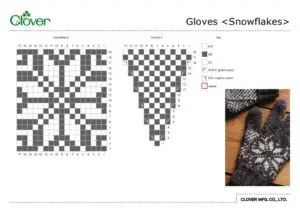
Gloves (Snowflakes)
Разработано
Rosee Woodland
Готовый размер
S (M: L) Finished palm circumference 14.5 (16.5: 18) cm Choose a size approx 1cm smaller than your palm circumference
Инструменты
3 stitch markers, one in a contrasting colour.
Stitch holder
Materials
・Yarn:
Cambrian Mountains Wool, Pure Llanwenog (DK, 100% wool, 50g/110m)
1 (2: 2) balls in Welsh Natural Grey
Small amount in Natural
Any pure wool or wool/alpaca blend yarn in a DK weight is suitable for this project
・Waste yarn
Abbreviations
DPNs double-pointed needles
K: knit
K2tog: knit 2 stitches together. 1 stitch decreased
Inc: increase
p: purl
Pm: place marker
Rm: remove marker
RS: right side
st(s): stitch(es)
Pattern Notes
These gloves are a nice introduction to working small circumferences in the round and are very easy to make with double-pointed needles. Clover DPNs come in different lengths. If you can, use the shortest length (12.5cm) for the fingers and either 20cm or 16cm length for the hands.
Gauge
22 sts x 28 rounds to 10cm, worked over stocking stitch and stranded colourwork using 4mm needles

Изготовление
RIGHT GLOVE
Using 3.25mm DPNs cast on 32 (36: 40) sts. Join to work in the round, being careful not to twist sts and place contrasting colour marker for beg of round.
Rib round: *K2, P2; repeat from * to end of round. Repeat rib round until cuff measures 4 (4.5: 5) cm from cast-on edge.
Change to 4mm DPNs. Next round (inc): K to end, inc 2 sts evenly across round. [34 (38: 42) sts]
**
Next rnd: K17 (19: 21) across round 1 of Snowflake chart S (M: L), pm, work across round 1 of Thumb chart S (M: L), pm, repeat round 1 of Chequers chart B (A: B) a total of 8 (9: 10) times to end. [1 thumb st]
***
Next round (inc): K across Snowflake chart to marker, slm, work Thumb chart to marker, slm, Repeat Chequers chart to end. [3 thumb sts]
Note: You can now work completely from charts for your size until the end of the thumb, but if preferred, increases are also written out below.
Work 2 rounds straight, following appropriate round of each chart. Repeat inc round, following appropriate round of each chart. [5 thumb sts]
Repeat last 3 rounds 3 (3: 4) more times. [11 (11: 13) thumb sts]
Work 1 round straight, following appropriate round of each chart.
Repeat inc round, following appropriate round of each chart. [13 (13: 15) thumb sts]
Repeat last 2 rounds 0 (1: 1) more times. [13 (15: 17) thumb sts]
Work 1 round straight, following appropriate round of each chart.
Next round (round 18 (20: 23 of Snowflake/Thumb chart): K across Snowflake chart to marker, rm, place next 13 (15: 17) thumb sts on hold on waste yarn, rm, cast on 1 st using the backwards loop method (tightly!) in CC (MC: MC), repeat Chequers chart to end. [34 (38: 42) sts]
Work 1 (3: 2) rounds straight of Snowflake and Chequers charts. Snowflake chart should now be complete.
Hand should reach base of little finger at this point. Try on and if it is too short, then adjust accordingly by working a few more rounds in Chequerboard chart across all sts.
****
Note: Recommended rounds are given for the length of each finger/ thumb below, but feel free to work more or fewer rounds. Work your decreases when you have reached the desired length of finger/ thumb.
Continue in MC only and change to shorter 4mm DPNs if you have them.
LITTLE FINGER
Next round: K4 (4: 5) sts, slip next 26 (30: 32) sts to waste yarn, cast on 2 (2: 2) sts using backwards loop method, K4 (4: 5) sts to end of rnd. [10 (10: 12) sts for little finger] Cont in rounds until you have worked 13 (15: 17) rounds from join. Next round: Work K2tog around until you have 6 sts remaining. Break yarn and thread through remaining sts and pull tight to fasten.
UPPER HAND
Rejoin yarn to base of little finger with RS facing, K26 (30: 32) across held sts, pick up and knit 2 sts across base of little finger. [28 (32: 34) sts for upper hand] Work 3 full rounds straight.
RING FINGER
Next round: K4 (5: 5) sts, slip next 20 (22: 24) sts to waste yarn, cast on 2 sts using backwards loop method, K4 (5: 5) sts to end of round. [10 (12: 12) sts for ring finger] Cont in rounds until you have worked 15 (19: 21) rounds from join. Next round: Work K2tog around until you have 6 sts remaining. Break yarn and thread through remaining sts and pull tight to fasten.
MIDDLE FINGER
Rejoin yarn to beg of round with RS facing. Next round: KS (5: 6) sts, slip next 10 (12: 12) sts to waste yarn, cast on 2 sts using backwards loop method, KS (5: 6) sts to end of rnd, pick up and knit 2 sts across base of ring finger. [14 (14: 16) sts for middle finger] Cont in rounds until you have worked 17 (21: 23) rounds from join. Next round: Work K2tog around until you have 6 sts remaining. Break yarn and thread through remaining sts and pull tight to fasten.
INDEX FINGER
Rejoin yarn to beg of round with RS facing. Next round: KS (6: 6) sts, pick up and knit 2 sts across base of middle finger, KS (6: 6) sts to end of round. 12 (14: 14) sts for index finger. Cont in rounds until you have worked 15 (19: 21) rounds from join. Next round: Work K2tog around until you have 6 sts remaining. Break yarn and thread through remaining sts and pull tight to fasten.
THUMB
With RS facing, pick up and knit 1 st from where palm meets held sts, knit across 13 (15: 17) thumb sts on hold, pick up and knit 1 sts from where held sts meet palm, pm for beg of rpund. [15 (17: 19) sts] Next rnd: Ssk, K to last 2 sts, K2tog. [13 (15: 17) thumb sts] Cont in rounds until you have worked 15 (17: 19) rnds from join.
Next round: Work K2tog around until you have 6 sts remaining. Break yarn and thread through remaining sts and pull tight to fasten.
MAKING UP
Weave in ends, using long tails to close any remaining holes at base of fingers and thumb. Block gently to even out the stitch pattern.
LEFT GLOVE
Work as for Right Glove to **. Next round: Repeat Checkers chart A (B: A) 8 (9: 10) times, pm, work across round 1 of Thumb chart S (M: L), pm, K across round 1 of Snowflake chart to end. [1 thumb st] Work as for Right Glove from *** to end, keeping chart placement correct throughout.