
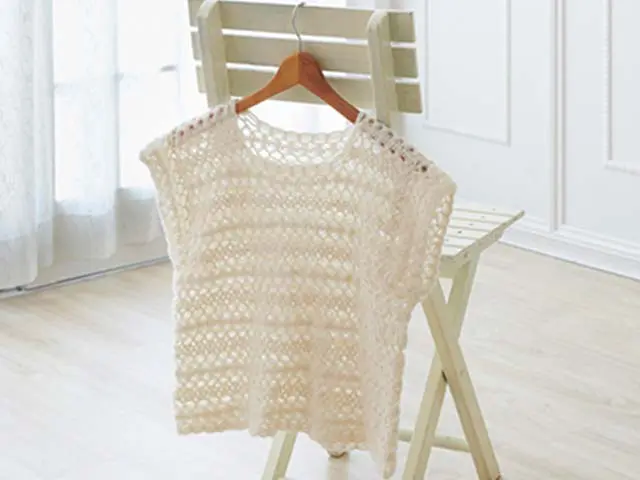
Hair Pin Lace : Pullover 1
Готовый размер
• Chest Measurement 96cm Approx. • Length 47cm Approx. • Shoulder Width 40cm Approx. • Sleeve Length 7cm Approx.
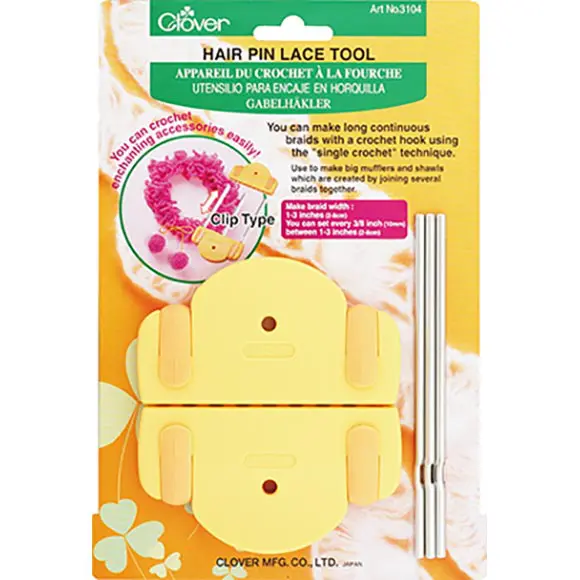
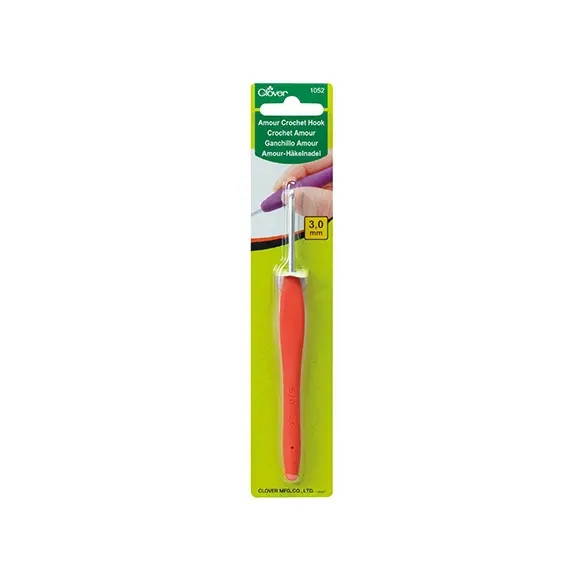
Инструменты

Materials
• Fingering (100 m/25 g) 125 g
Gauge
• With loom set 8cm width : 20 loops on each side =10 cm
Изготовление
Step 1. Make strips
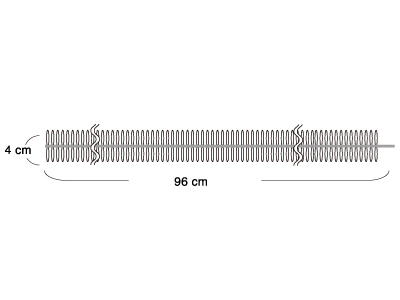
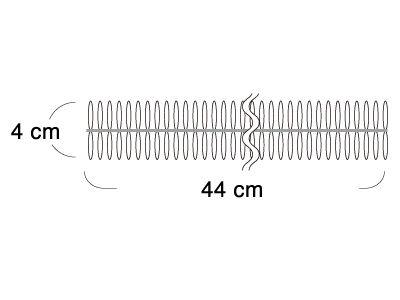
For all strips set Hair Pin Lace Tool 4 cm width.
Strips A : A-1 / A-2 / A-3 / A-4
Make 4 strips A of 192 loops on each side with a center SC.
Join the end to beginning stitch, make it round without twisting the strip.
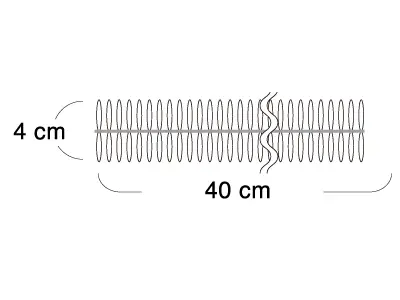
Strips B : B-1 / B-2/ B-3/ B-4 / B-5
Make 5 strips B of 80 loops on each side with a center SC.
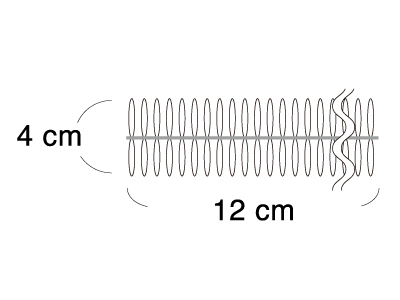
Strips C : C-1 /C-2
Make 2 strips C of 24 Loops on each side with a center SC.
Strips D : D-1 / D-2
Make 2 strips of D 88 Loops on each side with a center SC.
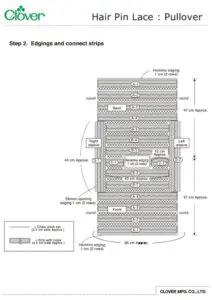
Step 2. Edgings and connect strips
1. Make bottom edging for A-1 and A-2 (page 3-4)
2. Make edging for A-1 and connect to A-2 (page 3-4)
3. Make bottom edging for A-3 (page 3-4)
4. Make top edging for A-2, connect to A-3* (page 3-4)
* pay attention to beginning stitch of strips for placing correctly from diagram on page4
5. Make top and bottom edging for A-4 (page 3-4)
6. Finish top edging for A-3 and connect to the A-4 (page 7)
7. Make bottom edging for B-1 (page5-6)
8. Make top edging for A-4 and connect to B-1 (page 6-7)
9. Make bottom edging for B-3 (page 5-6)
10. Make top edging of A-4 for back of pullover and connect B-3 (page 6-7)
11. Make top and bottom edging for B-2 (page 5-6)
12. Make top edging for B-1 and connect to B-2 (page 5-7)
13. Make bottom edging for B-4 (page 5-6)
14. Make top edging for B-3 and connect to B-4 (page 5-7)
15. Make top and bottom edging for B-5 (page 5-6)
16. make top edging for B-4 and connect to B-5 (page 5-7)
17. Make bottom edging for C-1 and connect to B-2, make top edging connect to B-5 (page 7-8)
18. Make bottom edging for C-2 and connect to B-2, make top edging connect to B-5 (page 7-8)
19. Make Neck edging (page-8)
20. Make top and bottom edging for D-1 and D-2 (Page-8)
21. Connect D-2 to body (Page-8)
22. Connect D-1 to body repeating same work to finish second sleeve and pullover
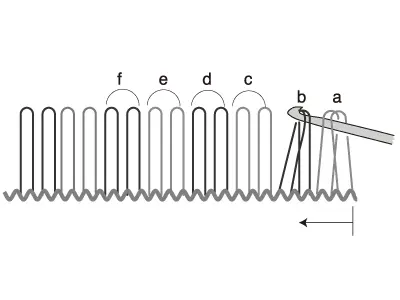
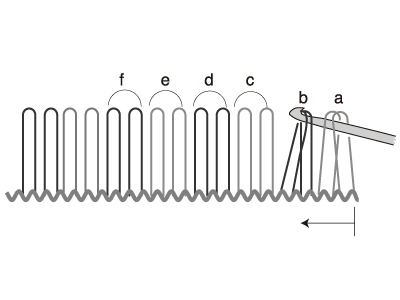
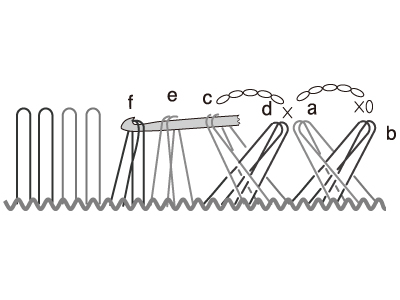
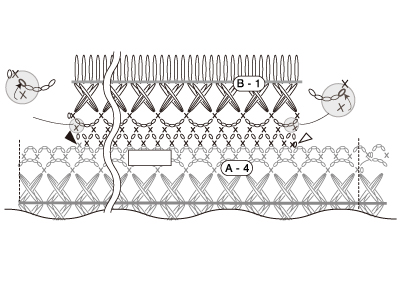
Gathering loops for A-1, A-2, A-3, A-4

Start working with A-1 first by following instruction below. Then repeat the work for other A strips.
*Gather 2 loops at a time.
Insert the hook into the middle of loop "a" and pull through loop "b" .

Remove the hook for a moment, and leave loop "b" as it is (it will be dealt with later).
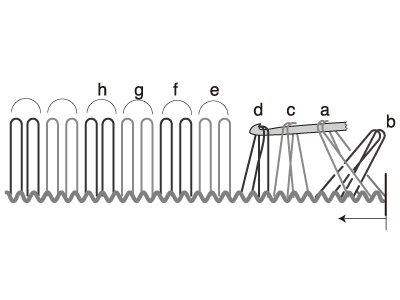
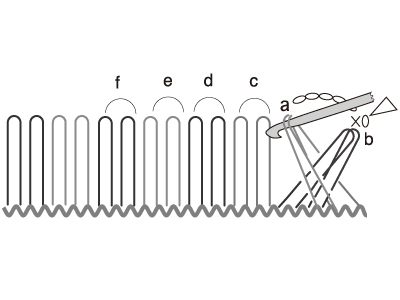
Place the hook through loops "a" , "c" , and "d" . Pull d back through the center of loop "c" , intersecting the two.

Leave loop "c" , and hook loops "a" and "d".
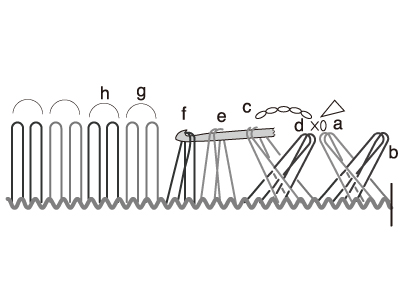
Join new yarn and complete 1 chain stitch, 1 single stitch, followed by 5 more chain stitches. Insert the hook into loops "c", "e", and "f".
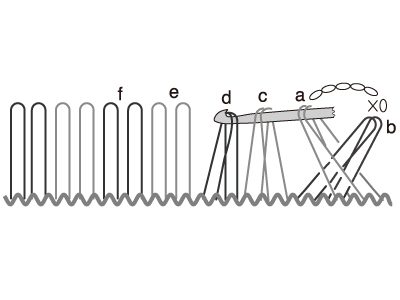
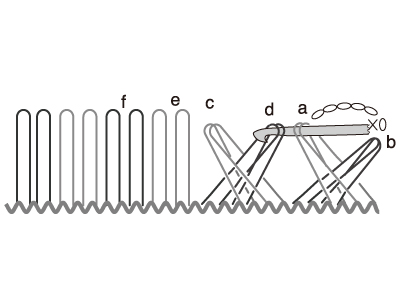
Pull "f" back through the center of loop "e" , intersecting the two. Leave loop "e" to the left.
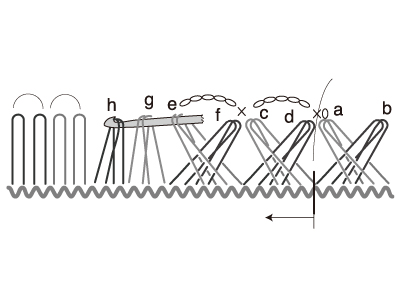
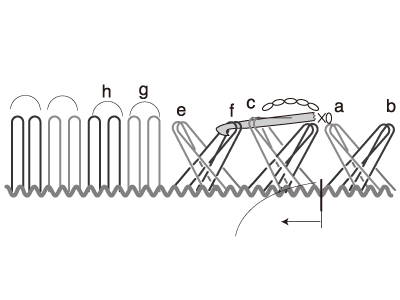
Bring "c" and "f" together with 1 single stitch, and 5 chain stitches. Continue as show in the diagram, intersecting and stitching loops.
Bring the final remaining loop back around and connect to loop ""b"" . Complete 1 single stitch and 5 chain stitches. Slip stitch the first row.
* Go to page 4 for Strip A-1 only to finishing bottom edging.
* for A-2,.A-3 cut the yarn and continue following the instruction on page 4.
* for A-4 repeat the work for upper part of strip. check diagram on page 4.
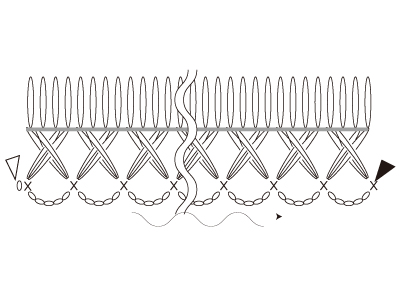
Edgings for A-1, A-2, A-3, A-4 (Step 2-1, 2-3, 2-5)
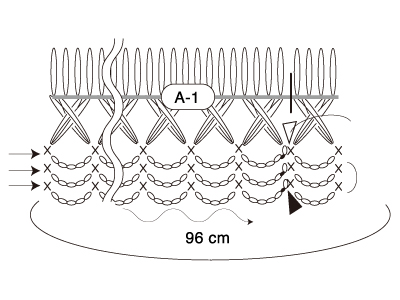
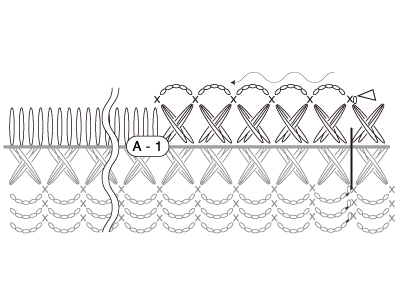
A-1 : Bottom edging
Finalise bottom edging for Strip A-1. Make 2 more rows. Join the work with sl st in first ch of the row cut the yarn.
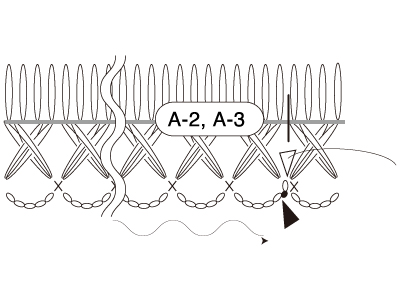
A-2, A-3 : Bottom edging
Do the same with the loops at the bottom of A-2 and A-3.
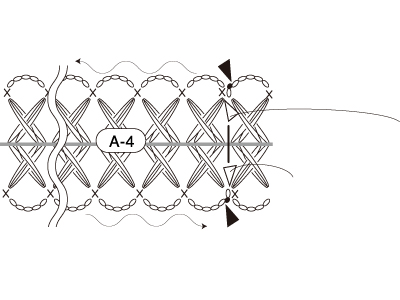
A-4: Top and Bottom edging
Finish both sets of loops at A-4 and cut the yarn.
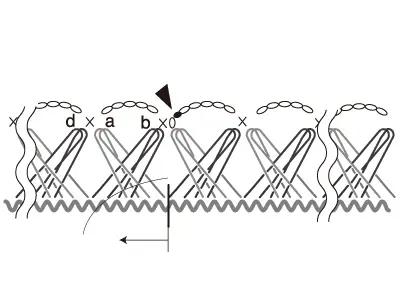
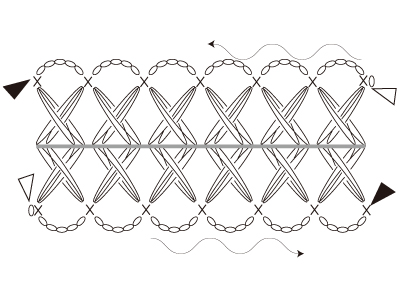
How to Connect Strips A-1, A-2, A-3, A-4 (Step 2-2, 2-4, 2-6)
Join new yarn on upper part of braid as seen on the diagram. Follow the diagram, and stitch 1 row on top of A-1.
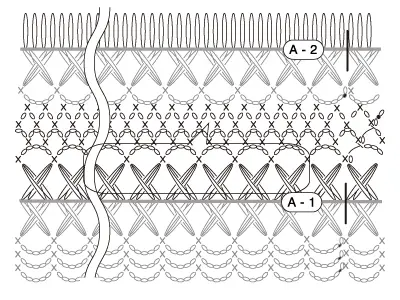
Continue with a second row. During the third row connect to the bottom of A-2.
Gathering loops for B-1 B-2 B-3 B-4 B-5 C-1 C-2 D-1 D-2
*Gather 2 loops at a time.
Insert the hook into the middle of loop "a" and pull through loop "b" .
Insert hook into loop "b".
Attach yarn and stitch loop "b", using 1 chain stitch, 1 single stitch, followed by 5 more chain stitches.
Place the hook through loops "a" , "c" , and "d" .
Pull "d" back through the center of loop "c", intersecting the two. Leave loop "c" to the left, and hook loops "a" and "d" , as shown.
Stitch "a" and "d" with 1 single stitch and 5 chain stitches. Insert the hook into loops "c" , "e" , and "f" . Pull "f" back through the center of loop "e" , intersecting the two. Continue repeating the above for the rest of the strip.
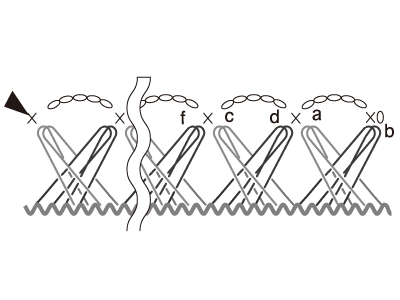
Stitch the final remaining loop using a single stitch.
* Cut the yarn for B-1, B-2, B-3, B-4, B-5 continue page 6 for following instructions
* Do not cut the yarn for C-1, C-2 and go to page 7 for finishing edging and connecting insrtuctions
* Do not cut the yarn for D-1, D-2. Go to page 8 for following instructions to finish the edging and connecting to body.
Edgings for B-1, B-3, B-4, (Step 2-7, 2-9, 2-11)
Finish the loops below B-1,B-3, and B-4, and cut the yarn.
Edgings for B-2, B-5 (Step 2-13, 2-15)
Finish both sets of loops at B-2 and B-5.
How to Connect Strips B-1, B-2, B-3(Step 2-8, 2-10, 2-12)
Connect B-1 to A-4:
Follow the image below, and stitch together A-4 and B-1 at the front using 1 chain stitch and a single stitch.
Connect B-3 to A-4:
Stitch the back (A-4 and B-3) in the same way.
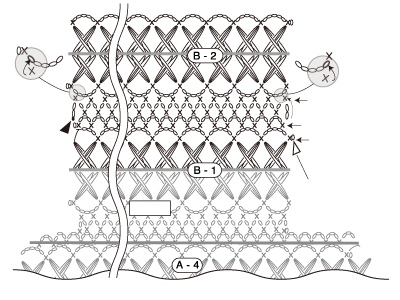
Connect B-2 to B-1:
With regards to B-1 and B-2 Start stitch the loops above B-1. During the third row connect with B-2 following the diagram.
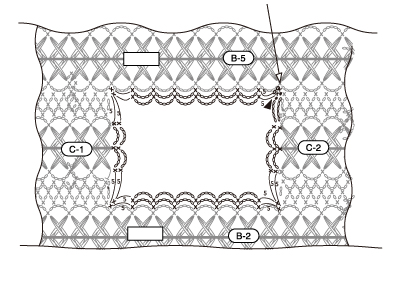
How to Connect Strips B-4, B-5, C-1, C-2 (Step 2-14, 2-16, 2-17, 2-18)
Connect B-4 to B-3, B-5 to B-4:
Connect the strips in the same way as you connected B2 to B1
Connect C-1 and C-2 to B-2 and B-5:
Place C-1 and C-2 in between B-2 and B-5. Like before, stitch over loops on the 1st row and on the 3rd row of stitches, attach with B-2 and B-5.
Edging the Neckline (Step 2-19)
Edgings for D-1, D-2 (Step 2-20)

Working row 1 of each side as shown in the below. At the sleeve opening, finish with 2 rows of edging.
How to Connect Sleeves: Strips D-1, D-2 (Step 2-21)
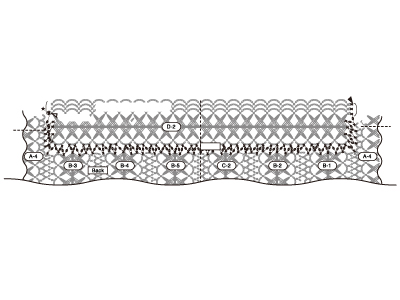
Line up D-1 and D-2 where the sleeves will go. Attach with 1 single stitch and 1 chain stitch. With a final 3 single stitch close of the edging, indicated by the star on the chart.
When you finish all the works. Clear all the threads weave them in the stitches. Turn inside out. Enjoy wearing your pullover.