
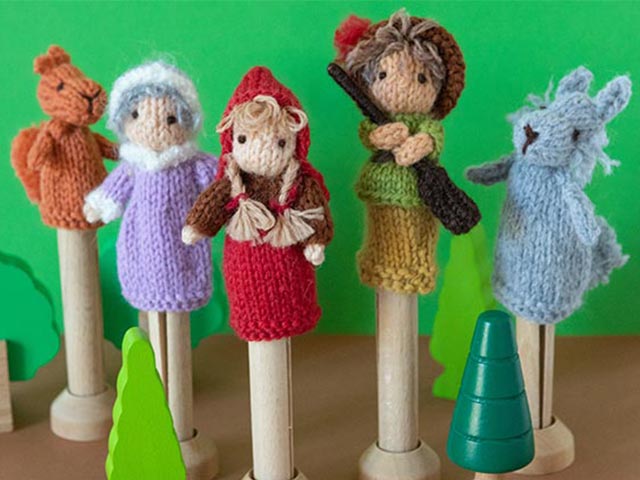
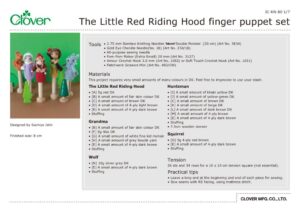
The Little Red Riding Hood finger puppet set
ออกแบบโดย
Sachiyo Ishii
ขนาดเมื่อทำเสร็จแล้ว
8㎝
ผลิตภัณฑ์


Materials
This project requires very small amounts of many colours in DK. Feel free to improvise to use your stash.
The Little Red Riding Hood:
• [A] 5g red DK
• [B] A small amount of fair skin colour DK
• [C] A small amount of brown DK
• [D] A small amount of 4-ply light brown
• [E] A small amount of 4-ply dark brown
• Stuffing
Grandma:
• [B] A small amount of fair skin colour DK
• [F] 5g lilac DK
• [G] A small amount of white fine kid mohair
• [H] A small amount of grey boucle yarn
• [E] A small amount of 4-ply dark brown
• Stuffing
〇Huntsman
• [I] A small amount of khaki yellow DK
• [J] A small amount of yellow-green DK
• [C] A small amount of brown DK
• [K] A small amount of beige DK
• [L] A small amount of dark brown DK
• [M] A small amount of 4-ply brown
• [E] A small amount of 4-ply dark brown
• Stuffing
• 7.5cm wooden skewer
Wolf:
• [N] 10g silver grey DK
• [E] A small amount of 4-ply dark brown
• Stuffing
Squirrel:
• [O] 5g 4-ply red brown
• [E] A small amount of 4-ply dark brown
• Stuffing
Tension
26 sts and 34 rows for a 10 x 10 cm tension square (not essential).
Practical tips
• Leave a long end at the beginning and end for sewing
• Sew seam with RS facing out, using mattress stitches.
Abbreviations
RS: right side
WS: wrong side
RH: right hand
St st: stocking stitch
St(s): stitch(es)
K: knit
P: purl
Kfb: k one through the front then through the back (same stitch)
K2tog: knit two together
P2tog: purl two together
Skpo: slip 1 stitch, k 1, pass slipped stitch over
Ch: chain(s)
Special technique: i-cord
Using double-pointed needles, cast on the required number of stitches. Do not turn. Slide stitches to the opposite end of the needle, then knit stitches again taking the yarn firmly across the back of work. Repeat to desired length. Cast off.
วิธีทำ
The Little Red Riding Hood
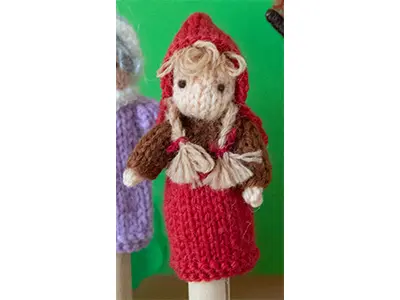
〇Body and head
With yarn A, cast on 24 sts.
Rows 1-3: Knit.
Rows 4-14: Starting with a p (WS) row, work 11 rows in St st.
Row 15: (K2, k2tog) to end. 18 sts
Change to yarn C.
Rows 16-20: Starting with a p row, work 5 rows in St st.
Row 21 (shape neck): (K1, k2tog) to end. 12 sts
Change to yarn B.
Row 22: Purl.
Row 23: K3, (kfb) six times, k3. 18 sts
Rows 24-26: Starting with a p row, work 3 rows in St st.
Row 27 (shape eyeline): K3, (k2tog, k1) four times, k3. 14 sts
Rows 28-30: Starting with a p row, work 3 rows in St st.
Row 31: K2, (k2tog, k2) to end. 11 sts
Break yarn, thread through sts, pull tightly and fasten off.
〇Sleeves: make two
With yarn C, cast on 10 sts.
Rows 1-3: Starting with a p (WS) row, work 3 rows in St st.
Row 4: K2, (k2tog, k2) to end. 8 sts
Rows 5-6: Starting with a p row, work 2 rows in St st.
Break yarn, thread through sts, pull tightly and fasten off.
〇Arms: make two
With yarn B, cast on 3 sts and work 5 rows in i-cord.
Break yarn, thread through sts, pull tightly and fasten off.
〇Hood
With yarn A, cast on 30 sts and work 10 rows in St st, starting with a k (RS) row. Cast off.
〇To make up
With fastened-off yarn end, sew head to neck. Sew body seam with cast-on end. Stuff head. With yarn B, work a gathering thread along neck and draw tightly. With the same yarn, work a gathering thread over eyeline and draw gently to create eye dent. Wrap arm piece with sleeve and sew seam. Attach sleeves to body. With yarn D, pierce head from side to side, leaving long loops. When you are happy with the volume, make plaits. Take 2 strands from yarn A and tie them around plait ends. To create front hair, backstitch with yarn D on the forehead, leaving loops. Fold hood piece in half lengthwise and sew cast-off edges together, leaving 2cm from side edge free. Attach hood to head. With yarn B, French knot the nose. With yarn E, French knot the eyes.
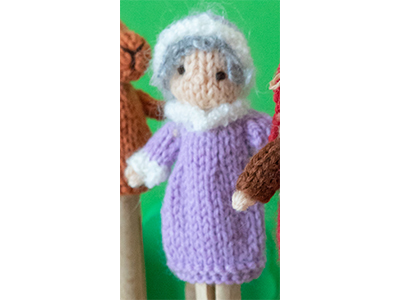
Grandma
〇Body and head
Follow the instructions given for The Little Red Riding Hood, using yarn F from row 1 to row 21 and yarn B for row 22 to end.
〇Sleeves: make two
Using 2 strands of yarn G together, cast on 20 sts.
Row 1 (WS): (P2tog) to end. 10 sts
Change to one strand of yarn F.
Rows 2-4: Starting with a k row, work 3 rows in St st.
Row 5: P2, (p2tog, p2) to end. 8 sts
Row 6: Knit.
Break yarn, thread through sts, pull tightly and fasten off.
〇Arms: make two
With yarn B, work as for The Little Red Riding Hood.
〇Hat
Using two strands of yarn G together, cast on 36 sts.
Row 1 (WS): Purl.
Row 2: (K2tog) to end. 18 sts
Change to one strand of yarn F.
Rows 3-7: Starting with a p row, work 5 rows in St st.
Row 8: (K2tog) to end. 9 sts
Break yarn, thread through sts, pull tightly and fasten off.
〇Collar
With one strand of yarn G, cast on 40 sts.
Rows 1-3: Starting with a p (WS) row, work 3 rows in St st.
Row 4: (K2tog) to end. 20 sts
Cast off.
〇To make up
Follow the instruction given for The Little Red Riding Hood for basic assembly, using yarn N for hair at forehead and omitting plaits. Sew the hat seam and attach to head. Attach collar at neck.
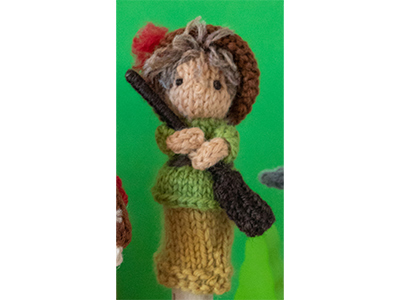
Huntsman
〇Body and head
Follow the instructions given for The Little Red Riding Hood, using yarn I from row 1 to row 15, yarn J from row 16 to row 21 and yarn K from row 22 to end.
〇Shirt piece below the belt
Note: This piece will be attached at the waist to make it look like he is wearing a shirt over trousers.
With yarn J, cast on 25 sts and work 3 rows in St st, starting with a p (WS) row. Cast off.
〇Sleeves: make two
With yarn J, cast on 8 sts.
Rows 1-2: Starting with a p (WS) row, work 2 rows in St st.
Break yarn, thread through sts, pull tightly and fasten off.
〇Arms: make two
With yarn J, work as for The Little Red Riding Hood, using J.
〇Hat
With yarn C, cast on 9 sts.
Row 1 (WS): Purl.
Row 2: (Kfb) in each st to end. 18 sts
Rows 3-6: Starting with a p row, work 4 rows in St st.
Row 7 (WS) : Knit for edge.
Row 8: (Kfb) in each st to end. 36 sts
Row 9: Purl.
Cast off.
〇Belt
With crochet hook and yarn C, make 16 ch. Fasten off.
〇Gun
With yarn L, cast on 7 sts and work 8 rows in St st, starting with a p (WS) row. Cast off.
〇To make up
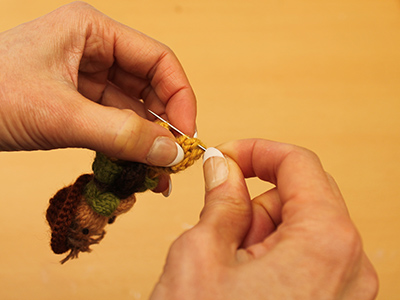
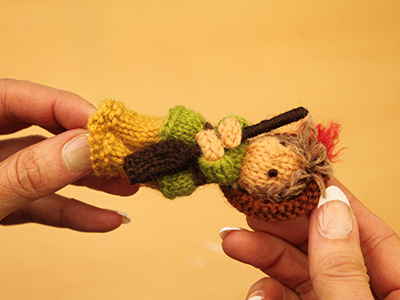
Follow the instructions given for The Little Red Riding Hood for basic assembly, using yarn M for forehead hair and omitting plaits. Attach the shirt piece at waist. Attach belt. Work a gathering thread along cast-on edge of hat and sew the rest of hat seam. Attach hat to head. With yarn A, sew backstitches on top of hat, leaving a loop every other stitch. Repeat 2-3 times. Cut loops and separate strands. To make up Gun, sandwich wooden skewer with the knitted piece and sew seam closed. With a length of yarn L, wrap skewer, wetting the skewer with liquid glue time to time. Secure Gun to body and arms. Pinch the hem of body at the front centre and stitch from bottom to 1cm from hem.
Wolf
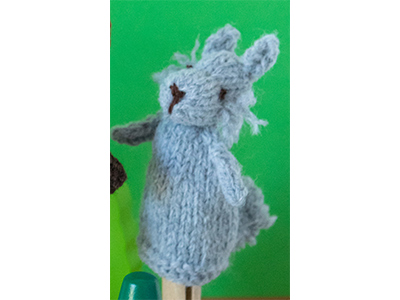
〇Body
With yarn N, cast on 24 sts
Rows 1-3: Knit.
Rows 4-14: Starting with a p (WS) row, work 11 rows in St st.
Row 15: (K2, k2tog) to end. 18 sts
Rows 16-20: Starting with a p row, work 5 rows in St st.
Row 21: (K1, k2tog) to end. 12 sts
Break yarn, thread through sts, pull tightly and fasten off.
〇Head
With yarn N, cast on 8 sts.
Row 1 (WS): Purl.
Row 2: (Kfb) to end. 16 sts
Rows 3-7: Starting with a p row, work 5 rows in St st.
Row 8 (eyeline): K4, (k2tog, k1) 3 times, k3. 13 sts
Rows 9-12: Starting with a p row, work 4 rows in St st.
Row 13: P3, (p2tog) 3 times, p4. 10 sts
Break yarn, thread through sts, pull tightly and fasten off.
〇Ears: make two
With yarn N, cast on 4 sts.
Rows 1-2: Starting with a p (WS) row, work 2 rows in St st.
Row 3: (P2tog) twice. 2 sts
Row 4: Skpo and fasten off.
〇Arms: make two
With yarn N, cast on 4 sts and work 5 rows in i-cord. Break yarn, thread through sts, pull tightly and fasten off.
〇Tail
With 20mm pompom maker, make a dense pompom.
Trim to elongated oval shape.
○To make up
Sew body. Sew head and stuff. With yarn N, work a gathering thread over eyeline and draw gently to create eye dent. Attach ears. With yarn N, work backstitches to sides of head, leaving a loop every other stitch. Cut loops and separate strands. With yarn E, French knot eyes and embroider nose and mouth. Attach head to body. Attach arms and tail.
Squirrel
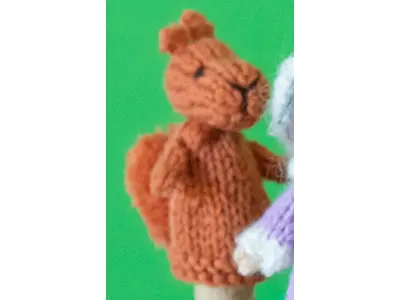
〇Body
With yarn O, cast on 24 sts
Rows 1-3: Knit.
Rows 4-8: Starting with a p (WS) row, work 5 rows in St st.
Row 9: (K2, k2tog) to end. 18 sts
Rows 10-14: Starting with a p row, work 5 rows in St st.
Row 15: (K1, k2tog) to end. 12 sts
Break yarn, thread through sts, pull tightly and fasten off.
〇Head
With yarn O, work as for Wolf to row 11. 13 sts
Row 12: K1, (k2tog, k2) to end. 10 sts
Break yarn, thread through sts, pull tightly and fasten off.
〇Ears: make two
With yarn O, cast on 3 sts.
Row 1 (WS): P2tog, p1. 2 sts
Row 2: Skpo and fasten off.
〇Arms: make two
With yarn O, cast on 4 sts and work 4 rows in i-cord. Break yarn, thread through sts, pull tightly and fasten off.
〇Tail
With yarn O, work as for Wolf.
〇To make up
Make up as for Wolf, omitting backstitches on sides of head.