
Meshwork Ribbon Bag
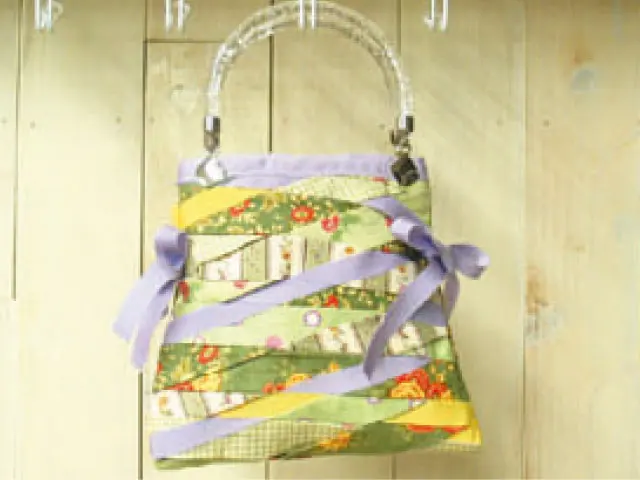
Finished Size
Approx. 20 cm width x 19 cm length *Excluding handles.
Tools


Bias Tape Cutting Ruler
Cutting Mat
Loop Pressing Bars
Awl
Marking Tool
Pins
Materials
• Fusible Web (10 mm width/12 m roll)
• Printed Cloth Approx. 30 cm x 35 cm 6 types.
*Including spares just in case.
• Ribbon < A > (Approx. 15 mm in width, heat resistant) 6.5 m each
• Ribbon < B > (Approx. 15 mm in width, heat resistant) Approx. 2.1 m
• Foundation piece of cloth (Cloth sheeting etc.) … 30 cm x 50 cm
• Interior Cloth … 24 cm x 42 cm
• Handles … One set.

Making
{Please find ""HOW TO MAKE : MESHWORK "" for the basics of mesh working}
Make tapes of cloth. Going with the grain of fabric, makes 6 strips 50 mm wide with 6 different types of fabric for a total of 36 strips. Cut the yellow ribbon into 6 strips of 35 cm long. Cut the purple ribbon into eight strips of 35 cm long and 4 strips of 80 cm long. Cut one more strips of purple ribbon, 35 cm long to use at the bag's opening.
*When cutting the cloth, use a Clover Rotary Cutter, cutting mat and Bias Tape Cutting Ruler.
Next make fusible bias tape using a 25 mm fusible bias tape maker. Take the cloth and some Fusible Web, and stick together using an iron. Please read the user's manual on Fusible Bias Tape Maker. For the ribbon simply press as is without using the Fusible Bias Tape Maker. For more details, please read the user's manual on Fusible Bias Tape Maker.
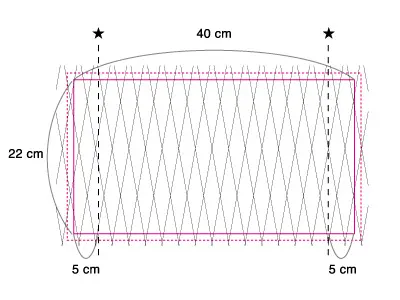
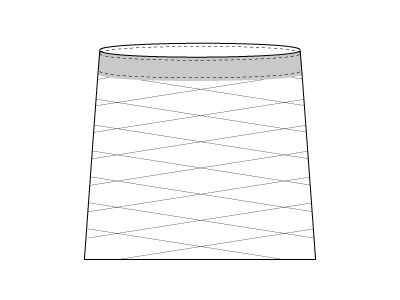
Link the tapes. Take the foundation piece, and use an erasable marker to draw a base point on all four sides (40 cm x 22 cm). Make a 10-degree angle with the top of the base line, this will act as a guide point on how to line up your pieces. Place your foundation piece of cloth onto the cutting mat, and line up the 20 pieces of cloth made in (2). Order the strips as detailed in the diagram, making sure that they are pointing a slight southeast direction, before securing in place with pins. Insure that an 80 cm purple ribbon is at the two ★ on the chart. Now lay down the pieces that will go across them, and begin weaving in a one over one under pattern. Use an awl to prevent any gaps.
When a 42 cm x 24 cm meshwork is made secure it in place. Erase the outline from (3) and iron the mesh, making sure not to damage any of the meshwork. Making sure to avoid the 4 longer ribbons, at the 41 cm x 23 cm point on the mesh (located 0.5 cm outside of the base line), sew a large seam; cut the 42 cm x 24 cm shape.
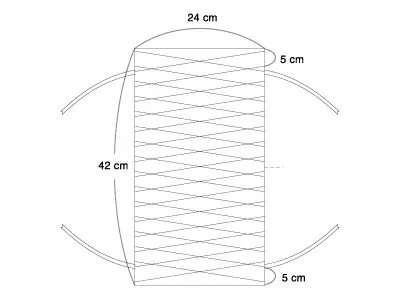
Turn the cloth inside out, and sew a 1-3 cm seam on both edges. Make the trapezoid form of the bag following the diagram below, still avoid sewing the 4 longer ribbons.
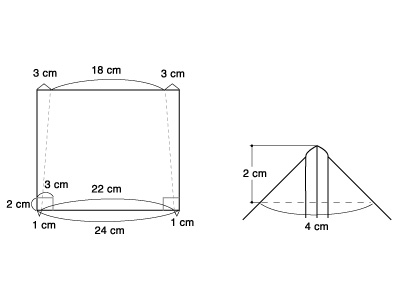
Make a gusset for the bag. On the front and back pieces of cloth, add markings for the gusset at the corners of both sides. Fold the corners into triangles. Break the seams and then sew.
Turn the bag right side out. At the bag' s mouth, fold 1 cm inwards all the way around. Take the ribbon prepared area and place at around the mouth of the bag, cover the edges of the meshwork as shown on the left. Sew in place. When the handles are complete the bag is finished.